Showing posts with label lunch. Show all posts

May 31, 2012

More Sushi... I'm An Addict

I'm addicted to my own sushi.

I know it's probably not the most modest to say that you have an addiction to your own food, but I have to be honest, I make pretty delicious sushi, and I love eating it almost more than anything else I make (With one exception!)

So You might get stuck with various sushi rolls of mine, as I experiment with new flavors. Todays?

Mango Pepper Avocado Roll

Ingredients:
Cooked Sushi Rice
An Avocado
A Mango
Some yellow and green Pepper slices
Black Sesame seeds
 A Sheet of nori

Directions:
Spread the sushi rice over the nori... you know the drill.
Cut up some of the mango into slices, some of the avocado into slices, and the pepper slices. Sprinkle on some black sesame seeds.
Roll er up, and slice.
Using a vegetable peeler, peel a slice of mango, and a slice of avocado to go on top of each roll.
Enjoy your fanciness! 

I think this roll would also work out well with some carrot in the center if you need a bit more crunch to it, and possibly some bamboo shoots, or even different slices of pepper. If you put in a green, red, and yellow pepper slices, you'd have a veritable rainbow of peppery goodness! I just happened to have only a yellow pepper and a green pepper, so here we are. My mango was also pre-cut, so i had to slice it thin with a knife, but it would have looked nicer peeled thinner!


May 22, 2012

Simple Sushi

It's no secret to those that know me that I enjoy eating fancy. I will add garnishes to my foods when I'm sitting alone at home by myself. I always wipe around the edges of my dishes so that there's no spatters before I eat.

It's a little bit of a sickness.

But one of the things I love to eat that makes me feel fanciest of all is Sushi.

When I started trying to make sushi rolls, I was hopelessly terrible. They were loose and fell apart, they had too much rice, or too little rice, they didn't roll right, the fillings fell out... It was very sad. But this was about 6 years ago, and since then I've practiced... not constantly, but at least once a month I'll make a sushi roll, so I like to think I've gotten better.

But the most important thing I've learned is one key thing: Always use the right rice.

Do not use Uncle Bens, minute rice, or anything like that. You need a nice, short grain, sticky rice. (I use Calrose Rice, and you can get that, and rice labled "sushi rice" at most grocery stores) If you have the wrong rice you're doomed for pointlessness.

You can also use Brown rice, for health reasons, but trust me when I say that it won't seal up as well, because it's not sticky.

But, without further ado, today's random roll!

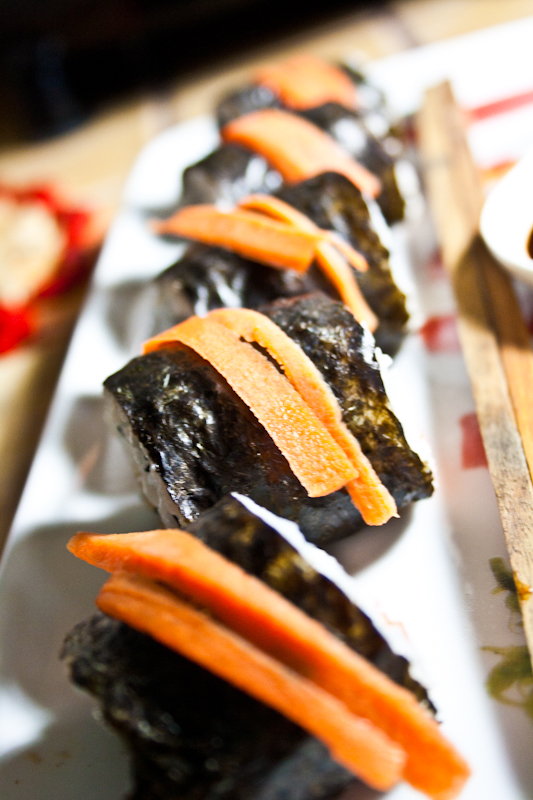
Carrot and BBQ tofu Roll
(Makes 1 roll)
Ingredients:
1/2 cup dry sushi rice
3/4 cup water
1 tsp seasoned rice vinegar
1 sheet of nori
black sesame seeds (optional)

1 carrot, peeled into strips
a few slices of tofu, enough to cover the length of a sheet of Nori.
1 tbsp Asian BBQ Sauce (I use San-J Brand. This also tastes great with Teriyaki sauce)

Directions:
Put your rice and your water in a rice cooker. Cook. When it is done, transfer the rice to a bowl. (If there are any stuck on bits at the bottom of the rice cooker, do NOT transfer those! Just the loose rice)
Using a rice paddle or wooden spoon, add in the rice vinegar, and stir around, flipping the rice over and over to both cool the rice, and mix in the seasonings.
Spread the rice over your nori in a thin, even layer. (I use the paddle, but if you want to use your fingers remember to keep your hands wet, so they don't stick.
Sprinkle the rice with some black sesame seeds if you want to.
In a microwave safe bowl, mix the tofu and Sauce so the tofu is covered. Stick in the microwave for 30-45 seconds.
While that's microwaving, lay down a few strips of carrot on one end of the nori. Add the tofu once it's done, and then roll it up! If you aren't sure how to roll sushi, Here is a good illustrated step by step.
Cut into 5 pieces with a sharp knife. Keep in mind that after every cut, you should run a wet cloth along the edge of the knife so it doesn't stick to the rice!
Then, enjoy with some tamari, or more BBQ sauce as a dip if you are big into BBQ. Or just eat without sauce, the choice is yours!


May 20, 2012

Grilled Veggie Sandwich

I have a sandwich thing. My thing is that I love sandwiches.

Not that big of a thing, I know. But when you find out you can no longer eat wheat, regular sandwiches are pretty much the first thing to go. And if you don't want to bake your own bread, for whatever reason, and have to buy store bought gluten free bread, non-grilled sandwiches are then out of the question, because the bread texture can be... iffy to say the least. Usually it's a weird crumbly mess, and it's just downright sad.

So, if you're like me, you move into the realm of paninis, because you can make grilled sammiches, or wraps, or even grill your own veggies quite easily, and they taste pretty good, even with iffy bread.

This weekend I got paid from my babysitting job (Worked 3 consecutive jobs over 2 days, was very tired afterwards!) and I said to my self, "Natalia, you know what you deserve? I good ol grilled sammich stuffed to the rafters with stuff. Not just any stuff. Your favorite stuff."

So I did. Here is that sandwich:
Grilled Veggie and Daiya Sammich

Ingredients (For 2 sandwiches):
4 slices gluten free bread
1/2 ripe avocado, sliced into slices
a few Mushrooms, sliced
fresh basil leaves
A few slices of tomato
Tofu cut into slices. (Marinated or not, it tends to still taste pretty good. I used some BBQ marinated)
A handful of Daiya Cheddar
Veganaise, salt, and pepper- to taste.

Directions:
Heat up your panini press. If you don't have a panini press, you can make this like a grilled sandwich in a pan, but it's easier with a press. (I think everyone, money able, should get an electric grill press, OR, like my sister got me at a thrift store, a stovetop grill press) I have also heard of people using waffle irons to make grilled sandwiches, but have never tried it myself. So many options!
So spread however much vegannaise you want on one side of each of the bread slices. If you're using an electric press, I've found you don't need to put any margarine or oil on the outside of the bread, but if you're going stovetop you might have to!
Then, layer up your stuff. The order of the layer doesn't matter so much, but I've found that the Daiya is best melted when it's right next to the bread.
Grill until the daiya is melted, and the bread is crispy.
Eat. EAT AND LOVE LIFE! 


March 2, 2012

Afternoon Asparagus Pasta

I love pasta. I love easy. I love delicious. So without Further Ado:

Mushroom Asparagus Spaghetti 
Ingredients
Enough Spaghetti to fill you up :) (I used Quinoa Pasta meself)
A few stalks of asparagus, chopped into pieces
a handful of mushrooms, chopped into pieces
1 tbsp minced garlic
1 tbsp olive oil
Basil, Salt, and Pepper (To taste)
A splash of white wine (no need to get good quality, I used a bottle I found on top of my fridge that was half empty.)

Directions
Cook the pasta. In the last minute, toss in the asparagus to cook it up. Drain in a colander.
Heat the oil in a skillet. Add the garlic and mushrooms, and cook until the mushrooms are browned.
Add in the pasta and asparagus, and begin to toss. Add the wine to deglaze, and sprinkle with the spices. Toss around to coat everything.
Then Eat. It's delicious. And That easy!


December 2, 2011

Bean Pancake Paninis

I've been trying to come up with easy and quick lunches, and I usually end up right back at paninis. But Paninis can get a bit boring, so I need to sort of jazz it up.

And I thought to myself "What else can we panini?"

It came to me- pancakes!

Bean Pancake Paninis with A side of Potatoes
Ingredients
1/2 cup GF Bisquick
1/3 cup mixed beans of your choice, mashed
Salt and Pepper, to taste
1 tbsp olive oil
water

The Toppings I used:
sundried tomatoes
vegannaise (vegan mayonnaise)
spinach
Basil
Oregano
Salt and pepper
Tempeh

Potatoes, sliced and cooked.

Directions
In a bowl mix the bisquick, mashed beans, salt and pepper, and olive oil.
Add water a bit at a time, until it's the texture of pancake batter.
Fry up the pancakes, and set aside.
Heat up your panini press.
Take 1 pancake, and spread the vegannaise onto it.
top with the sundried tomatoes, spinach, tempeh, and spices. (or whatever toppings you choose!)
Top with another pancake.
Carefully transfer onto panini press, and grill until the top of the top pancake is crisped.
Cut in half, serve with potatoes, and enjoy the noms.


November 25, 2011

I'm Back!

I know, I've been away, but trust me when I say that it was NOT MY FAULT.

Last weekend, Matthew started feeling poorly, he had a bad stomach ache. It was bad enough to wake him up from sleep at 7am, which let me tell you, is painful. (He can sleep through a hurricane!) He thought it would go away, so got up and tried to watch 24 until it went away.

It got worse.

So we went to the hospital in concern, and it turns out he had to have emergency gallbladder removal surgery! We've been sort of recovering from the whole thing, though Matthew is in good spirits!

I however have been stressed and exhausted beyond belief (which I think is understandable!)

So my recipe for returning to the blogging world is a fairly simple one.

Fairly Simple Sweet Pea and Carrot Pasta Salad
Ingredients:
2 cups gluten free pasta (I used Quinoa Fusilli) cooked
1/2 cup frozen peas, thawed
1 medium carrot, finely grated
1/3 cup non-dairy milk
1 tbsp agave nectar
1 1/2 tbsp mochiko flour (Sweet glutinous rice flour- does not contain gluten!)
1/3 cup vegannaise
Salt and Pepper, freshly ground to taste
Any of your favorite spices, to taste (Optional)

Directions
Mix together the pasta, peas and carrot, tossing so they're all combined.
Next, in a microwaveable bowl, mix together the mochiko flour, agave, and non-dairy milk. Combine well!
Microwave at 15 second intervals, stirring between each interval, until it's thick and goopy.
Mix the milk mixture with the vegannaise, combining well.
Season with the salt and pepper, until it reaches the right taste.
If using any other spices add them now, tasting as you go. Oregano and Basil work well together, especially if you also add some cherry tomatoes to your pasta salad!
Take your sauce mixture, and add it to the pasta, stirring well to distribute. Eat right away, or refrigerate for guests, or picnics, or lunches, whatever!

As an aside, the mochico flour mixture, if you play with the amount of liquid vs flour can work as a condensed milk substitute! :)


November 11, 2011

A no-cook meal for a quiet Friday

I've had a bit of a hectic week, as I may have mentioned! However, after needing to do something for my job this morning (which made me get up very early!) I had absolutely nothing to do in the afternoon.

This is awesome. I caught up on my DVR, I took a bath, I read some e-mails, and I decided to be equally lazy with my meal, and made a no-cook lunch, mostly (le gasp!) pre-prepared. This doesn't mean processed, just pre-made. But I also like to feel slightly fancy, as Tom says, Treat yo self!

So here's what I made:

So in the front, we have rice stuffed grape leaves, in olive oil with mint (you can get these in cans, they're incredibly delicious!) As you can see, there is an abundance of pomegranite seeds. The little grocery I go to (I do most of my shopping at a tiny little independently owned grocery store which carries a lot of imported foodstuffs, which I love. They also have GF noodles, which I appreciate!) had a sale on pomegranites, so I took advantage of that like nobody's business. At first I thought to myself, "Pomegranites won't go with this, will they?" But then I said "Ah, who cares, I'm doing it anyway!"

They tasted awesome with it.
In the back we have brown rice crackers topped with black olive and olive oil puree, a slice of fresh tomato, and more pomegranite seeds.

This dish was flavorful, delicious, easy, and so pretty and colorful to look at!

October 24, 2011

Sorry for the slowness, eat a salad!

Man, I am the worst blogger on the planet! Fear not, it should pick up soon, I just had a few setbacks this month, mostly dealing with trying to get student loans ironed out so I RECEIVE student loans!

I have successfully gotten the loans approved and am just waiting for it to arrive, so I can continue to go to school. In addition! I have been approved for a computer loan from the government, so I can turn in this sad little clunker (which now makes a rather concerning grinding noise when it is on) for a new streamlined machine. Worry not! Until I get that set up, I will continue to use this computer to update the blog, which should have more content very soon!

In other news, my stress over student loans made me reverse course on my healthiness, I have eaten more chips and french fries than I care to admit in the past two weeks. :(  le sad. However, I am trying to detox off of  my addiction to salty deep fried foods (my kryptonite) by spending two weeks on a sort of detox with lots of salads, veggies, brown rice, and fruit smoothies for breakfast. No fried foods, no junk foods, no candy, no refined sugars. It's a bit daunting, but I spent almost a year doing it, and didn't regret it the last time, so welcome to a healthier Natalia Eats (for the next two weeks anyway, then I will occasionally sway when I need a bit of fried tofu or something!) I will also include nutritional information from now on!

Also, welcome to my new lunch!
Cranberry Almond Spinach Salad
Ingredients:
3 cups Spinach
1/3 cup craisins (dried cranberries)
1/4 cup slivered almonds
1 tsp olive oil
1 tsp vinegar (I used Cider, because a gross spider snuck into my balsamic, and it grossed me out so I chucked it, but I usually use balsamic)
1 tbsp dijon mustard

Directions:
Combine the mustard, oil, and vinegar, and stir until combined.
Toss with the rest of the ingredients, and eat!

Nutritional Information:
Calories: 332
Fat: 18g
Carbs: 41g
Protein: 8g
Deliciousness: 8.5/10 noms

October 19, 2011

A little Simple Tiffin Lunch for your Wednesday

It's been a while since I posted a tiffin lunch, one of those 3 tiered lunches I make for Matthew.

I haven't been 100% lately, been dealing with a few life issues, and all last week Matthew was off from work, so we weren't home a lot, hence the lack of updating. I've been a terrible blogger!

In other news, I've become the editor of an academic journal for my department's graduate Journal, Word in the World. We're taking submissions for the next issue, so if you are a graduate student and have a paper, poem, story, or painting dealing with anything Theological, feel free to e-mail it to me! (If it is a painting or photo, or photo of a work of art, make it as high resolution as possible!) Click here to do so!

Back from plugging my new job, here's the food!

Deconstructed Sushi and Salad Tiffin

Layer 1

Spinach Salad
Ingredients
Enough Spinach to almost fill the tiffin
A small handful of peels from a carrot
A small handful of Dried Cranberries

Directions
Layer the salad with spinach on the bottom, carrot, and then craisins. 

Layer 2
Cranberry Cherry Salad Dressing
Ingredients
1 tbsp olive oil
1 tbsp rice vinegar
1 tbsp dijon mustard
1 tbsp cranberry cocktail
1 tbsp black cherry juice
(I had a bottle of cranberry cherry juice, so I used 2 tbsp of that)
some snow peas for bottom of container

Directions
In a small container with a screw on lid, put all of the dressing ingredients. Shake vigorously until all the ingredients are combined. 

Layer 3
Deconstructed Sort of Sushi
Ingredients
1 cup Rice Mix
1 tbsp rice vinegar
1/2 small onion, diced
1 tsp sesame oil
1 tsp tamari
the peels from a small carrot
1 tbsp rice vinegar
1 sheet nori, shredded
1/4 cup tofu, diced into tiny dices
1 tsp sesame oil
1 tsp tamari
Sprinkles of sesame seeds or rice seasoning

Directions
Mix together the Rice mix and 1 tbsp rice vinegar, set aside.
Pour the other vinegar into a bowl, and add the carrot peels. Set aside.
In 2 small bowls, mix up the separate sesame oils and tamari. Add the tofu to one bowl, and the onion to another. Mix them well. 
In a small non-stick frying pan, fry up the tofu mixture.
Once cooked, mix together with the rice and shredded nori. Press into bottom of container.
Cook up the onions in the same frying pan. 
Drain the carrot peels, layer the carrots with the onions on top of the sushi, and top with the sesame seeds or rice seasoning. 

That's it! Tadaa!


September 7, 2011

Tiffin Lunch #2

So the greatest thing you can EVER pack for lunches are leftovers.

Leftovers tend to taste fine the next day, and by bringing them to school/work you prevent forgetting about them in the recesses of your fridge and finding fuzzy mystery used-to-be-food in a container. Never cool.

When I was little, my dad used to make leftover sandwiches for me from time to time. Whatever he'd made the night before he'd slap between two layers of bread and call  it a sandwich. Some were more successful than others. (Mac and cheese sandwich the other kids are jealous, baked bean sandwich and you get made fun of!) While this is fun occasionally, I tend to avoid sandwiches because you get caught in the PB&J trap when you're a vegan. Once in a while it's yummy, but every day, not that great!

Without further ado:
Tiffin Lunch #2- Leftover Salt and Pepper Spicy Dinner!
Layer 1
Layer one is brown rice with peas, mixed with some tamari and sesame oil, and topped with sriracha sauce. If it was for me, I would forgo the sriracha and sprinkle on a few red pepper flakes, but Matthew loves his spice!

Layer 2
Matthew's favorite apple slices again, but instead of cinnamon, a little bowl of mixed up peanut butter and vegan hazelnut/chocolate spread. (Basically vegan nutella) Nom nom! 

Layer 3
Layer 3 is my most complex this lunch. Divided with some plastic sushi grass, on one side we have coleslaw mix topped with the following dressing, a recipe by my good friend Dani:
Dani's Thai Style Dressing
Ingredients:
1 tsp sesame oil
1 tsp rice vinegar
1 tsp agave nectar

Directions:
Put all ingredients in a jar with a lid. Shake to mix. Top salad with it. 

On the other half is salt and pepper tofu and eggplant, which is easy to make, and SO DELICIOUS. 

Salt and Pepper Tofu and Eggplant
Ingredients:
1/2 block medium firm tofu, pressed and cut into squares
1/2 medium eggplant, cut into squares
2-4 tbsp cornstarch
Salt, Pepper, and Red pepper flakes to taste, but be generous
Oil, for deep frying. 

Directions:
Mix the cornstarch and spices into a large freezer bag. Dump the tofu and eggplant into the bag, and shake to coat with all the goodness. Set aside for now. 
Heat up oil in a pan on medium high. (Stick the handle of a wooden spoon into it to test. If bubbles form, the oil is ready!)
Fry the tofu and eggplant in batches for about 1 minute, until they turn brown and crispy on the outside. 
Drain on paper towel, and enjoy!

This made enough for 2 people to have for one night, and the amount you see for Matthew's lunch the next day. 

Happy Eating!

September 5, 2011

Tiffin Lunch #1

So I have been told by a friend trying to go vegan that her biggest difficulty is coming up with what to pack for lunch.
While her old lunches would have been sandwiches of meats and cheeses, becoming vegan (and gluten free) means adapting to different styles of packed lunches. (Especially if you want to also move away from processed foods!) So every monday and wednesday this month, I will be showcasing what I pack Matthew for lunches (as I am rarely out of the house at lunchtimes except for tuesdays, when I am a teaching assistant for a class in the afternoons. Otherwise, I am out before or after lunch, but tend to be here when my lunch is being eaten.

I pack Matthew lunches in a Tiffin, which is a 3 layered lunch box with a frame that snaps together to hold all of the layers together. It is made out of metal, and I got it in Chinatown in Montreal. However, you can buy them in a variety of materials and sizes online! Also, you can use bento boxes, or really any re-usable container for your lunches. I find the 3 layer tiffin to be useful as I tend to structure his lunch into 3 parts- vegetable, fruit, and a carb (to keep his energy a goin!) Since it is made out of metal, he has a little bowl he packs with it in order to microwave anything he wants heated up as well! :)

Without Further Ado:
Tiffin Lunch # 1

Layer 1:
on the bottom layer, I cut up apples, and dipped them in some lemon water (to slow browning) and then sprinkled them in cinnamon! 

Layer 2:
Layer 2 consisted of steamed corn on the cob and steamed carrots. I cut up the corn on the cop into little rings so it would fit. I also added a bit of vegan margarine, as well as freshly ground salt and pepper, to add a bit more flavor!

Layer 3:B
For the final layer, I put noodles, leftover marinara sauce, and frozen peas. Since this was for Matthew, and he isn't on a gluten restriction like I am, I tend to use Ramen noodles in his lunch, because A: He likes them, and B: They cook really quickly. I never use the sauce packets though, I put my own sauces (because they taste better!) He tells me it tastes very good with marinara! I added some freshly ground salt and pepper as well. 

And that's that!

Total prep time: Cutting the apples: 1 minute
Chopping and steaming the vegetables in the microwave: 3 minutes
Cooking the noodles and saucing them: 7 minutes

Total Time: 11 minutes. 

Make it right before you go to bed, and stick it in the fridge, and you're good to go for the next day!

July 7, 2011

Internet is Restored, and Potatoes are in my belly

The technician just left! We are a go for internet!!!

It's almost sad how much I missed it, but I've decided not to think about it too much. I should be finishing unpacking my apartment (still not done), cleaning said apartment (Sorta needs it, but I swept and did the dishes today, so I declared myself good), or working on my thesis research (It's still packed up around here somewhere!)

Instead I want to talk to you about potatoes.

Potatoes are a trifecta of awesome- delicious, versatile, and nutritious. They're also a staple of hungry people everywhere world over. People love their potatoes.

However, when I was growing up they were usually only made 3 ways- fried into chips, mashed with butter and milk, or baked with butter on them.

Not the most elaborate of ways. I dare myself to do better, to take it one step further, and thus today created some yummy potato croquettes!
Easy Potato Croquettes


Ingredients:
1 medium/large Potato, cooked (I nuke it in the microwave)
1/3 cup chopped bell pepper (I used orange)
1 tbsp vegan margarine or olive oil
1-3 tbsp almond milk (or your favorite non-dairy milk. Make sure it's unflavored and unsweetened!)
1 tbsp Nutritional Yeast
1/3 cup breadcrumbs or cornmeal
Dash of Salt and Pepper

Directions:
Mash your potato (With peel on!) with the margarine, adding in milk by the spoonful. Stir with a spoon until smooth.

Add in the nutritional Yeast, chopped bell pepper, and the salt and pepper, and stir well to combine.

Form the potatoes into slightly flattened disks, and then coat with the breadcrumbs.

Fry in some margarine or non-stick spray, until each side is slightly browned.

Serve and enjoy with deliciousness! They'd be good with ketchup, but I gobbled them up plain! I served em with some plan steamed Edamame, and a homemade glass of Mint Chocolate Iced Tea.

Nom Nom Nom!

July 6, 2011

Back from the Dead! (With a Wrap!)

I finally got my act together and showed up at Starbucks with my computer, the power cord, and my camera card, so I can FINALLY update this blog with a recipe!

My goodness! I completely apologize for this madness!

However, take a look at those delicious looking sliced veggies over there! Orange and Yellowy goodness! And all of them went into a delicious wrap I like to call the Cheesewrap Supreme.

And, as an added bonus, instead of just a wrap, I'm also including a delicious coated fries recipe as well!

You're welcome! :)

The Cheesewrap Supreme
Ingredients:
1 Brown rice wrap (or flour tortilla if you aren't gluten free!)
1 cup of a combination of the following: Sliced Yellow Peppers, Sliced Orange Peppers, Sliced Yellow Zucchini
1/3 cup Vegan Cheddar (I use Daiya)
1 cup of baby spinach
A sprinkling of Red Pepper Flakes For Spice (Optional)
Directions:
Preheat a panini press or grill
Put your wrap flat on a cutting board. Spread the cheese in a line evenly across the center, and sprinkle with pepper flakes if using. 
Next, top with the wrap with the spinach, spreading it out evenly. 
Top with the peppers and zucchini. 
Fold the edges of the wrap over the center, and transfer to your grill. (I like to hold it down with the top of a spatula while I close the top of the grill, and then pull the spatula out while pressing the top of the grill down, so that the wrap doesn't come open!)
Grill until the cheese is melted, and there are scorelines on the wrap. 
Cut in half and serve!

I'm not done yet, because I also promised you:

Rosemary Coated Fries
Ingredients:
3 Medium potatoes
1 cup corn meal
1 tbsp dried rosemary (Ground)
A dash of both salt and pepper
1/3 cup olive oil

Directions:
Preheat the oven to 425, and line a cookie sheet with parchment paper. 
Chop the potatoes into sticks, and toss with the olive oil. 
Mix the cornmeal with the rosemary, salt, and pepper. Place in a plastic container with a lid. 
Transfer the oil coated fries to the box with the coating, and shake the box around until the fries are nice and coated (You may have to do this in sections!)
Bake for 10-15 minutes, Flipping halfway through!

Enjoy!

July 3, 2011

Our first Lunch in the new place!

As I've harped on already, moving is exhausting! Even though we still don't have a stove quite yet (it comes later today!) and I had to come down to the local second cup to write this, I still managed to make a pretty delicious lunch.

Also, check out the first groceries I got for our new place! Not a huge haul, but a nice one none the less!

A bag of frozen peas and carrots, some pineapple, some coconut milk, some chopped garlic and a bit of cilantro paste.

I love cilantro paste, mostly because I despise cutting up herbs. I'll admit it, I take shortcuts when I can! Besides, being cooked in recipes it's far more convenient, and it also takes WAY longer to go bad! But moving on!

What Did I cook?

Well, Using the new rice cooker that Matthew got me for my birthday, I made a delightful rice dish for lunch!

If any of you have ever wondered what my recipes look like before I take the time to type them up here, check out my delightful chicken scratch recipe over here! I try to write down the recipes as I've making them (I rarely use cookbooks for anything, to be honest, though I own a lot of them!) I mostly do this so that I don't forget how much of everything I've put into my dishes, so that I can share them with y'all!

But onto the recipe!

Yummy Rice Cooker Rice with Peas and Carrots


Ingredients:
Sauce:
1 tsp Sesame oil
1 tsp garlic, minced
1 tsp ginger, minced
1 tsp chili paste or Sriracha sauce
2 tsp Cilantro Paste (or 2 tbsp chopped cilantro)
3 tbsp Tamari or Soy Sauce


Rice:
2 cups jasmine rice
3 cups water
1 cup frozen pea/carrot mix (Edamame also works nicely in this!)

Directions:


Mix together all of your Sauce ingredients in a small bowl, and set aside.

Next, take your rice and water, and place them in your rice cooker.

Add in the sauce, and swirl everything around, turning on your rice cooker and letting it go.

Twiddle your thumbs and clean up any dishes while that cooks.

When it is finished cooking, turn it to the warm setting, and mix in your peas and carrots. Let it sit for 5 minutes on warm setting to let the peas and carrots get unfrozen.

Serve! I garnished mine with some more cilantro paste and a shaking of red pepper flakes. It was super delicious!


But what if you don't have a rice cooker? You can still make it on stovetop with these modified directions:

Mix up the sauce as above.

Add the rice, water, and sauce to a pot, and place on high until the water starts to boil, stirring frequently.

Turn to low and cover the pot, allowing it to simmer for 5 minutes.

Turn the heat off, and let it sit, covered for 10-15 minutes, until all water is absorbed. Fluff the rice with a fork, and mix in the carrots and peas, re covering for 5 minutes.

Enjoy!

June 24, 2011

Happy Fete Nationale- Simple Curry Noodles

Hi Everyone! And if you happen to be in the Province of Quebec, Happy Fete Nationale!

When I awoke this morning, I forgot it was a holiday in Quebec, and had gone downtown to pick up some things at the Canadian Tire, and was irked to find it closed.

Luckily, the asian Market downtown was open (The one on Saint Catherine near St. Marc) and I was able to pick up some shiritaki noodles and mushrooms for this yummy curry noodled dish!

It's very simple and easy, so prepare yourself for the yummies.

I may not have gotten the moving supplies I needed, but my break from packing is full of deliciousness. Recipe after the jump!


June 22, 2011

Strange Bedfellows- AND Unscrewuppable Stirfry Sauce

So I awoke this morning to this face staring at me. The little curly tail twitching head cocked wanting attention... My roommates Dog had nuzzled her way into my bed, and curled down next to me, wanting snuggles.

Meanwhile, down the bed, another family friend was doing her best to take up as much room as humanly possible, trying to retain the heat left by Matthew as he got up to go to work.

Why am I not working, you may very well ask.

Well, I brought back from vacation a quite nasty cold/flu thing, as well as a broken toe (Ouchies!) so I'm stuck in the house for the week, but it's not so bad, as We're moving to a new place next week and I'm supposed to be packing for that. (How much is actually getting done is besides the point!

I also decided that I needed to make my ultimate comfort food, a stirfry.


Now, I make stirfries so often, I tend to forget that some people may be unfamiliar with the basic anatomy of a stirfy, ie what should be put in it, what ingredients to use, what sauce to use, etc.

It's super simple.

Basically, you can put anything you want in a stirfry (except mashed things, obviously, but I'm going to assume we're all reasonable intelligent people!) This includes whatever sauce you want. But if you're unsure of what sort of sauce you want to chuck in there, I've got a sure-fire delicious stirfry sauce that I've never once heard a complaint about!