Showing posts with label daiya. Show all posts

May 20, 2012

Grilled Veggie Sandwich

I have a sandwich thing. My thing is that I love sandwiches.

Not that big of a thing, I know. But when you find out you can no longer eat wheat, regular sandwiches are pretty much the first thing to go. And if you don't want to bake your own bread, for whatever reason, and have to buy store bought gluten free bread, non-grilled sandwiches are then out of the question, because the bread texture can be... iffy to say the least. Usually it's a weird crumbly mess, and it's just downright sad.

So, if you're like me, you move into the realm of paninis, because you can make grilled sammiches, or wraps, or even grill your own veggies quite easily, and they taste pretty good, even with iffy bread.

This weekend I got paid from my babysitting job (Worked 3 consecutive jobs over 2 days, was very tired afterwards!) and I said to my self, "Natalia, you know what you deserve? I good ol grilled sammich stuffed to the rafters with stuff. Not just any stuff. Your favorite stuff."

So I did. Here is that sandwich:
Grilled Veggie and Daiya Sammich

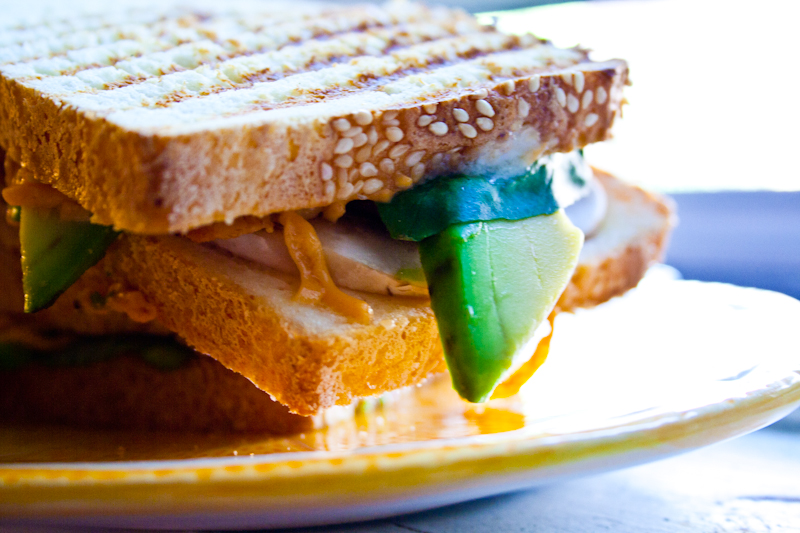
Ingredients (For 2 sandwiches):
4 slices gluten free bread
1/2 ripe avocado, sliced into slices
a few Mushrooms, sliced
fresh basil leaves
A few slices of tomato
Tofu cut into slices. (Marinated or not, it tends to still taste pretty good. I used some BBQ marinated)
A handful of Daiya Cheddar
Veganaise, salt, and pepper- to taste.

Directions:
Heat up your panini press. If you don't have a panini press, you can make this like a grilled sandwich in a pan, but it's easier with a press. (I think everyone, money able, should get an electric grill press, OR, like my sister got me at a thrift store, a stovetop grill press) I have also heard of people using waffle irons to make grilled sandwiches, but have never tried it myself. So many options!
So spread however much vegannaise you want on one side of each of the bread slices. If you're using an electric press, I've found you don't need to put any margarine or oil on the outside of the bread, but if you're going stovetop you might have to!
Then, layer up your stuff. The order of the layer doesn't matter so much, but I've found that the Daiya is best melted when it's right next to the bread.
Grill until the daiya is melted, and the bread is crispy.
Eat. EAT AND LOVE LIFE! 


February 16, 2012

Deep Dish Pizza

I recently received my winnings from my pizza contest entry, and I was thinking "I need some pizza... I need some bad"

But not any type of pizza... I needed deep dish pizza.

Imagine my surprise when I told Matthew of this craving, and he'd NEVER HAD IT. I was shocked, and it only steeled my reserve to make it even more.

I've been trying to get healthier lately, eat less junk food, etc etc, so you might think to yourself "But Natalia! Deep Dish pizza isn't healthy!" To you I say- "Shut up! I've been exercising, I'll put vegetables on it!"

And I did

Deep Dish Pizza
Ingredients:
1 Pckg of Bob's Red Mill Gluten Free pizza crust mix, prepared like the package (Until after rising it)
Toppings of choice.
Some Cornmeal

My Toppings:
Daiya Cheddar
Pineapple Chunks
Baby Spinach
Artichoke hearts
Mushrooms
Diced Tomatoes Mixed with some tomato paste
Black Pepper, Garlic, Basil, Oregano, and a bit of olive oil, as well as a tiny bit of nutritional yeast


Directions:
Oven @ 450
At This point, you've got your dough all risen and stuff. Take a springform pan, and spray the inside with some pam, or wipe it down with oil.  Toss a bit of cornmeal in there, and swish it to stick to the sides.
Press the dough into the pan, thinner on the bottom, slightly thicker on the sides, about 1-2 inches high for the crust sides. Toss a bit more cornmeal in there!
Bake the crust for 10 minutes or so, until it is firmed up.
Remove from the oven, and let cool for a few minutes.
Top with your toppings. (The order I have mine listed are from bottom to top, though I mixed the spices in with the tomato mixture, and then dusted the top with nutritional yeast.
Return to oven, and bake for 30-40 minutes, until it's all cooked through.
Remove from oven, and let cool for 5 minutes or so before cutting!
Then eat, and enjoy!


January 24, 2012

A delicious Panini

I recently stumbled upon This. That looks pretty good, doesn't it?

Alas, not vegan, OR gluten free. I felt like this needed to be rectified. However, there's a problem.

I can't make grilled cheese sandwiches. I wish I was kidding about this, but I have never been able to cook grilled cheese. I always either burn them, or the cheese wasn't melted. I was terrible. TERRIBLE.

Until Matthew got me a panini press that is.

Guacamole and 'Cheese' Panini with Garlicy Potato Wedges
Ingredients
1/2 an avocado
1/2 a small tomato
a bit of garlic (to taste)
Lime juice (to taste)
Salt and Pepper (to taste)
Cheddar or Mozza Daiya (I like to pile it on myself)
2 Slices of gf bread
Some vegan margarine
1-2 potatoes
olive oil
salt & pepper
garlic powder
Dried Parsley
Directions
Set your oven to 425. 
Nuke the potatoes until almost cooked. Allow them to cool for a few minutes, and then cut them into wedges. Toss with the oil, and place onto a lined cookie sheet. 
Shake the spices onto the potatoes. Bake for 20 minutes, turning once, until the outsides are crispy. 
Meanwhile, spread the margarine onto the outside of your bread. Cover one slice with guacamole, and cover that with as much  Daiya as you like. Top with the second slice of bread. 
Either grill (if you are competent, which I am not) Or panini it until the cheese is all nice and melty. 
Cut in half, and serve with the potatoes, and some ketchup, if that's your preference. 

December 20, 2011

My last puffed Pastry Recipe for a While

I promise, this is the last one!

Man, it's been a bit of a stressful few weeks! You might not know this, but I'm a teaching assistant at the university in the Theology department, and all the papers for the class I deal with were due, so it was epic paper marking time! I did read a lot of really great papers, and some... less successful efforts shall we say!

But I finished marking on Sunday, inputted all the marks on Monday, which means I'm done for the semester! Matthew and I leave on Friday to go visit family, however I shall try to keep with a semi regular updating schedule over the holidays :)

Onto the food!

I had a bit of puffed pastry left from the first use of it, so I decided to make a pie. Unfortunately, my pie pan was dirty, and being lazy I didn't feel like cleaning it... So I used a casserole dish. This was in error, I should have DEFINITELY gone pie pan, as it was a bit too deep to pull out pieces of it neatly, so the pictures aren't as pretty as I like. However, It did taste AMAZING, So I'm just going to let it go for now.

Vegetable Puffed Pastry Tart
Ingredients: (all of these are what I used for my dish, however they will alter slightly for different sized baking dishes!)
1 medium onion, sliced
2 medium potatoes, sliced
Enough puffed pastry to cover your dish
2 cups diced tomatoes
2 cups sliced mushrooms
1 1/2 Cups Daiya Cheese

Directions
Preheat your oven to 350.
Roll out the dough, and cover your baking dish with it. Bake for about 10 minutes while you slice up all your veggies.
Remove the partially cooked dough from the oven, and begin layering all of the innards onto it. I did Potato, Tomato, onion, mushroom daiya in 2 layers, but do whatever feels right.
Bake for 45 minutes.
Remove, eat, enjoy!

Nom!

December 10, 2011

Homemade Pizza Pockets

So recently I've become obsessed with making my own puffed pastry. I've been thinking about it, dreaming about it... I want to make Tempeh sausage rolls. I've been dreaming of them.

So I located this. The only change I made was to use Earth Balance sticks instead of butter, and it worked pretty well.

I unfortunately screwed up the combination of the butter and the dough, AND I think my dough needed a bit more water, it was sort of crumbly, so my next attempt will fix these things, and hopefully I can roll it into a sausage roll. Since I couldn't quite roll it the way i wanted, I made pizza pockets instead!
Oooh, this looks good!

What Could be Inside of this?

Oh My Damn!
Pizza Pockets
Ingredients:
Tartlette's GF puffed pastry made with Earth Balance, rolled into rectangles of the same size (Poptart sized)
Diced tomatoes
Daiya Vegan Cheddar
Toppings of your choice (I used sundried tomatoes and mushrooms! Cut them into small pieces)
Basil, Minced Garlic, salt and pepper. 
A little bit of soy milk

Directions:
Preheat the oven to 400, and line a cookie sheet with parchment paper.
Mix together the tomatoes with the basil, garlic, salt and pepper. Place it on the bottom of 1/2 of your rectangles. Leave about 1 cm of space on either side. 
Top with the toppings. Top the toppings with the cheese. 
brush a little soy milk around the edges. 
Place the untopped rectangles on top of the topped rectangles. They usually rip a bit, but if they don't, prick them with a fork in a few places to let steam escape!
Brush the top with some more soy milk. 
Bake for about 15 minutes until the tops are browned. 
Then Eat those things!
To DIE for!


November 28, 2011

A simple Panini

I think all this taking care of Matthew (first with the bad flu, and then with his surgery) has worn me down a bit. I've had a sore throat for days and I'm exhausted. Trying to recoup today, relaxing, eating healthy foods, drinking lots of tea. Which brings me to my next point.

I have an obsession with Paninis. Matthew bought me a panini press a few years ago for Christmas, and I have been ridiculously addicted ever since.

I love that you can make almost ANYTHING into a panini! It's so delicious! So long as you have something to sandwich it between, anything can be a panini!

Tempeh and Sundried Tomato Panini
Ingredients:
1 Brown rice (or whatever your favorite is) wrap
1/3 cup Daiya Cheddar
4 chunks of sundried tomato, cut into little pieces
1/4 cups tempeh, cut into chunks
Basil, Oregano, Salt and Pepper, to taste


Directions:
Layer the Wrap with the ingredients.
Grill on a panini press.
Eat.

That's it!

However, if you don't have a panini press, don't fret! There are options!
1 option is to cook it on a grill or BBQ, squashing it down with a spatula. You can also use a frying pan with some non-stick spray on it, squashing it down with a spatula. Or you can get a stovetop grill, and use that as well! Waffle Iron? Do it up! George Foreman Grill? Works too!

So many options for panini fun, however Panini presses are awesome, and if you have a slot on your christmas list, or a few dollars extra hanging around, I would pick one up!

Look at that cheesy closeup!


November 2, 2011

Fancy Mac and Cheese

Ever need something fancy to prove to non-vegans that your food isn't tasteless mush? When I first 'came-out' as vegan as it was often difficult to explain to people that I wasn't eating just lentils and brown rice, or other brown tasteless mushes just to keep me sustained. Apparently vegans used to eat that back in the day. Poor people!

Luckily, in the current age there's all sorts of things Vegans eat! Taking out meat really hasn't slowed any of us down, has it? However, every once in a while you still need that little helping hand, a dish that really makes the stubborn go "Oooh, yum!"

And I have this dish!
Fancy Mac and Cheese (Serves 3-4)
Ingredients:
1 cup dry macaroni noodles
1/2 zucchini, sliced thin
2 smallish tomatoes, sliced thin
3 Spring onions, the white bits chopped up and put aside, and then the stalks chopped up and put separately.
a few sprigs of basil, chopped (and more for garnishing if desired)
1 tbsp of olive oil
1/3 cup non-dairy milk
1 1/2 cups Daiya Mozzarella
Freshly ground Salt and Pepper

Directions:
Preheat the oven to 350.
Bring a pot of salted water to a boil. Cook up the macaroni. Drain and place in a casserole dish. Set aside.
Next, in a frying pan or wok, heat the olive oil on medium high. Add in the zucchini and white bits of the spring onions. Saute for a few minutes.
Once the zucchini are mostly cooked, add in the tomatoes, basil, and onion tops. Saute for about 1 minute.
Toss with the macaroni.
Feel free to use the same pan for the following steps- heat up the milk until it just boils. Add in the cheese, and stir until melted. Season with salt and pepper.
Pour the cheese over the noodles, and stir slightly to get the cheese mixed to everywhere.
Bake for 30 minutes, until the top is bubbly and slightly crispy.
Serve with some basil as a garnish if you're being super fancy! Then wait for expression of happiness on your skeptical omnivore friend's face!


October 9, 2011

How to Kludge a Pizza

So when you're gluten free and vegan, one of the first things that tends to go is Pizza. Which is sad, for me, because Pizza is awesome!

You can put all sorts of things on it, eat it while walking, share it with friends... It's just delicious. As a child we never had much pizza, so it was always a biiiig treat when we did, usually once in the summer at this one place in Ocean City, NJ, called Mack and Manco's Pizza. Awesome Pizza.

However, even as a child I was never really satisfied, because I had very specific things I liked and didn't like on pizza. I was never a huge meat person, so all I ever wanted were veggies- pineapple, mushrooms and olives to be precise. But we always got pepperoni because I was outvoted. 

But HA! I'm an adult now, I can eat whatever pizza I want! 

I need to apologize about the following photos, they aren't very good, but it was late, I was laughing while I took them, and it was more to get Matthew with our pizza creation, not to get a great pizza shot. 

So! How to kludge a pizza. If you're lucky, like I am, there might be a pizza place in your neighborhood that has gluten free crusts. (I am lucky!) If you aren't gluten free, this still works, and becomes easier because you can just order a normal pizza. Order whatever toppings you want, and then ask for it WITHOUT cheese. 

Next, wait. 

When it arrives, rip open a package of Daiya Mozzarella, OR grate your favorite vegan cheese block, and sprinkle generously on top. 

Then rebake that sucker under the broiler until the cheese is bubbly and slightly browned. 

Remove from oven, and eat. 

Eat good people, and remember the joys of pizza! 

October 3, 2011

Gettin in Shape, and A Cheesy Soup

I am no stranger to weight loss/getting in shape. In fact, I once lost 70 lb in one year, which was pretty much my most memorable attribute in many people's eyes. In fact, I saw a friend's father recently, who hadn't seen me in the six years since I left highschool, and his only comment was "Natalia! You shrunk!".

Yes, many a year ago (okay, 3 years ago) I weighed over 200lb, was sort of known as the jolly chubby sister/friend, and ate horribly. Then I found veganism (Cue magic music) and in a year of eating wholesome vegan balanced meals, and exercising, I dropped 70lb. (See Photo. As an aside to the photo, I enjoy that my taste in eye wear doesn't seem to alter)

However, that was a year ago, and I've gotten a bit lax and gained back a bit of the weight (nothing major, like 20lb in a year) Curse my love of potato chips and french fries! (I'm a deep fried potato nut!)

This wouldn't really be much of a problem, because I'm not obese, just slightly chunky, and I'm fairly happy with myself, however next July looms an EVENT.

I'm getting Married. In a big wedding (150 people, which might not be huge for weddings, but it's big for me!), and everyone's eyes will be on me, and I'll have camera flashing away for an entire day. I don't like being the center of attention in the best of times, but when there's cameras involved to document it? Freak out.

So, starting today I've begun my new "no junk food and perhaps exercise you lazy bum" get in shape routine to lose that 20lb again. Maybe 30. But no more than that (I think I'd start to look really weird, because I have a large ribcage, I'd be all ribcage!)

So for exercise today, I did a solid 20 minute cardio and ab circuit, and sat down to try to come up with some healthy veggieful recipes that would be filling and delicious. And wouldn't you know it, I had made one this weekend?
Cauliflower Carrot Cheese Soup
Makes about 6 Servings
Ingredients
1 Medium Head of Cauliflower, chopped into pieces
3 Medium sized carrots, chopped into pieces
3 Cups water with a bouillon cube or 3 cups vegetable stock
1 cup Daiya Cheddar
Non Dairy Milk
Freshly ground salt and pepper

Directions
In a large pot, bring the Water with bouillon or stock to boil.
Add in the Cauliflower and carrots, cooking until softened.
Allow the soup to cool for about 15 minutes.
Blend the soup in a blender until creamy. You may have to do this in portions, and add a bit of Non-dairy milk to smooth it out and reach the desired consistency.
Return the soup to the pot, and add in the cup of Daiya.
On medium heat, stir the soup until the Daiya melts into it.
Add salt and pepper to taste, and Enjoy!
Anyone else trying to get healthier?

As an aside, any larger breasted women looking for a good exercise bra, I would check out this one. It's the one I use, I've had it for over 6 months, and it still works great!

September 30, 2011

The Best Taco I've ever eaten

I don't use terms like "The Best <food item> I've ever had" Lightly. I reserve it for something truly special.

This taco is something special. I don't know why, but the flavors just blended together perfectly, AND it's healthy! It had just the right amount of spice, just the perfect blend of spice and sweet. It was... divine. This recipe makes enough for 2 delicious tacos!

Black Bean Tacos
Ingredients
2 taco shells
1/2 cup Daiya Cheddar
1/2 cup Black beans
1 tbsp taco seasoning mixed into 1/8 cup water
1 handful baby spinach
1/3 cup Salsa (I used peach mango salsa- I recommend!)
Directions
Turn on the Broiler. 
Spread the Daiya across one side of the taco shells, and place that side down on a baking sheet with parchment paper on it. Pop into the oven and bake until the cheese is bubbly. 
Meanwhile, in a small non-stick frying pan, combine the taco seasoning and beans, cooking on medium-high and stirring often, until the water is dissolved. 
Finally, take the taco shells, and fill them with the baby spinach, salsa (divided in two) and beans. 
Eat, and enjoy the magic in your mouth!


September 18, 2011

Unusual Pancakes for Dinner

Today I had a bizarre encounter, one of those strange encounters that you get when you live in a city.

As one of my many money-making odd jobs, I walk dogs. Dog walking is one of my favorite odd jobs, as it pays well, it's easy, you get some exercise and sunshine, and dogs are great company! Matthew was home, and a woman in the next building asked me to walk her 3 dogs- 2 huskies and a husky/corgi mix, because she had to work long hours for the weekend, and her husband was out of town.

So Matthew and I are walking the dogs (who are generally very well behaved) and a woman with a cat on a leash walked around the corner. The dogs started barking, and the little corgie/husky (who wasn't barking, just curious) slipped her leash and went over to the cat, and sniffed at it. The cat freaked out and started hissing (understandably.)

Now, If I were the woman (and if any of you were the woman) I would have A) Never walked my cat on a leash and B) picked up the cat and walked away. Instead she stood there looking confused as I had to pick up the 40 pound dog and walk across the street to try to get the walking harness back on.

ANYWAY, onto the recipe! A yummy pancake concoction with Daiya cheese and peanut butter! I know this seems weird, but my favorite sandwich as a child was peanut butter and cheese, and this combines these two flavors in a non-animal producty/glutinous manner, and is SUPER delicious!
Peanut Butter and Cheese Pancakes
Ingredients
1 cup GF Bisquick OR 1 cup GF Flour mix (with xanthan) or (if not GF) 1 cup bisquick or flour
1 tbsp vegetable oil
1/2 tsp vanilla
1-1 1/2 cups non-dairy milk (depending on texture)
3 tbsp peanut butter
1/3 cup Daiya Mozzarella Style Shreds
Maple Syrup (for topping)

Directions:
In a bowl, combine bisquick, peanut butter, vanilla, oil, and a bit of the milk. Stir to combine.
While stirring, add in a bit of milk at a time, until it is a nice runny consistancy (like normal pancake batter)
Add in the cheese, and stir to combine.
Heat up a frying pan on medium high, and spray with some non-stick coating.
When nice and hot, drop in some batter, and cook until the uncooked top is bubbling up, and the edges look  crispy/dry.
Flip pancake, and cook a few minutes more until cooked through.
Repeat with rest of batter.
Serve with Maple Syrup, and enjoy the unusual but delicious pancakery!
Nom Nom Nom

September 16, 2011

Poutine Re-Do

I love poutines, quite a bit. But I try not to flood the blog with all sorts of similar things. However, when I come up with a great alteration to a dish I love, I think I can share it with you.

Usually, I make my poutine Quebecois with some regular white potatoes and sweet potatoes, however, I have discovered that beets can also be used to great effect!

Beet and Potato Poutine
Before Baking, looking good!
Ingredients:
Gravy of your choice, about 1/3 cup
4 small potatoes, cut into fries
2 medium beets, cut into fries
Olive Oil, salt, and pepper
1/2 cup Daiya Mozzarella style

Directions
Preheat the oven to 425.
Coat the fries and beets with the olive oil, salt, and pepper.
Place the fries onto parchment paper on a baking sheet.
Bake for 10 minutes, and flip.
Bake for another 15 minutes, until outsides are crispy.
Take a small casserole dish, and cover it in aluminum foil.
Transfer half of the baked fries to the casserole dish.
Sprinkle 1/2 of the Daiya cheese on top of the fries. Add the rest of the fries, and top with the rest of the cheese.
Put the casserole dish into the oven, and bake for approx 10 minutes, until cheese is nice and melty.
Heat up the gravy at the same time.
Remove the fries from the oven, and transfer to a dish. Top with gravy, and enjoy!


Melty Cheese! :)
And for your viewing pleasure, completely unrelated to food... My Grumpy Kitty!


September 1, 2011

Extra Thursday Dinner- Carrot and Cheese Bowl

Enjoy this super easy carrot and cheese bowl!

Carrot and Cheese Bowl
Ingredients:
1 carrot, sliced up
1 slice of avocado, diced
1/4 cup chickpeas
1/3 cup Daiya Cheddar Cheese
Alfalfa Sprouts
Freshly ground salt and pepper

Directions
In a non-stick frying pan, stirfry (no oil necessary) the carrots and chickpeas until the carrots are mostly cooked.
Add in the salt and pepper, and mix to combine.
Add in the cheese, and mix to combine, allowing the cheese to melt.
Fill a bowl with the alfalfa sprouts, and top with the cooked mixture.
Top with avocado dices. Eat

Thursday Quick Lunch- Cheddar Fusion Roll

I created this for the Daiya recipe contest, so I won't post the recipe here at the moment, but it took less than 10 minutes, and I got to use up last night's leftover brown rice, so woot.

A Vegan Cheddar Fusion Roll. 
Before Rolling

The Finished Product!

Nom Nom!

August 7, 2011

A Quebecois Tradition(ish!)- The Vegan Poutine

I am not going to pretend that the following recipe is healthy. It's not.

However, it's slightly healthier than it's non-vegan counterpart.

For those who are unaware, Canada boasts two different type of poutine: The Acadian Poutine, and the Quebecois Poutine.

An acadian poutine (which I plan on veganizing soon!) is a ball of salted meat surrounded by a ball of mashed and grated potatoes, boiled in salted water and drizzled in molasses. It's way better than it sounds!

However, the Quebec have a much more fast food style dish named the poutine, which is french fries covered in cheese curds and gravy. It's decadent and greasy, and oh so delicious! And I veganized it.

Vegan 2 Potato Poutine Quebecois (serves 2 hungry people!)
Ingredient:
2 Medium Sweet Potatoes, chopped into fry shapes
2 similar sized regular potatoes, chopped into fry shapes
Oil, for frying

1 Mushroom style bouillon cubes
2 cups water
1 tbsp Cornstarch and 1 tbsp GF flour, mixed into a paste in water. 

1-2 cups daiya mozzarella style cheese

Directions
First, you gotta deep fry those potatoes into fries. Essentially, heat the oil, and then drop a few handfuls of potatoes in at one time, cooking until crisp and then draining on some paper towel. 
While the fries are draining, combing the bouillon cube with the water in a sauce pan, and bring to a boil, dissolving the cube. 
Add in the cornstarch and flour mixture a bit at a time, until the gravy is thickened to your liking. Set aside. 
Layer the fries and cheese in an oven-safe dish, and don't be stingy on the cheese!
Once the layering is done, evenly drizzle the gravy over the fries. 
Put under the broiler for about 5 minutes, until the cheese is nice and melted. 
Remove, allow to cool for about 5-10 minutes, and eat!

I like to eat mine with some ketchup on top, if that's your fancy!

August 1, 2011

Cheezy Stuffed Peppers

Happy August!

No preamble today! Just a delicious yummy Recipe!

Cheezy Stuffed Peppers
(Makes a bunch of filling!)
Ingredients:
Peppers, for stuffing, tops cut off and seeds removed.
4-5 medium carrots, chopped
1/2 cup frozen peas
1/2 largish yellow (or green, whatever!) zucchini, chopped
4 pattipan squashes, chopped into pieces (i love these little things!)
1 medium onion, chopped
1 cup chopped mushroom
1 1/2 cup rice cooked in veggie broth instead of water (still hot!)
2 tbsp vegan margarine, divided
1 cup Daiya mozzarella, with a bit more for topping
Oregano, Salt and Pepper (to taste!)

Directions:
Heat your oven to 350.
In a bowl, mix the rice, 1 tbsp margarine, daiya, and spices. Set aside. 
Heat a sautee pan, and melt the remaining margarine, adding in the onions and mushrooms. Saute for 2 minutes. 
Add in the rest of the vegetables, and saute for about 5-8 minutes, until all are softened. 
Dump the vegetables into the rice mixture, and toss to combine. 
Jam as much as possible into your peppers! If you have peppers that won't stand up straight, cut them in half lengthwise, and lie them on their sides instead of standing them up, it'll still taste great!
Top the peppers with a bit more Daiya, and then place their jaunty little caps back on (if you want to!)
Chuck in the oven and bake for about 30 minutes, until the cheese is all melty, and the peppers have softened up!
Then, eat you crazy vegans, EAT!
As a note, these are also popular with non-vegs!


July 26, 2011

Back home, and eating Ravioli!

I am finally back in MTL, with my extremely messy, crowded apartment. My friend's wedding was quite lovely, and a wonderful picture of myself and her brother, a good friend of mine from Highschool, (we were in the band together!) was taken and I think looks great! Oui oui?

I have that sort of post-visit malaise where everything is annoying me, so it was really lucky that the ravioli I made last night turned out. (I meant to post it yesterday, but I sat down to read for a bit at around 8, and then woke up this morning at 7, so that didn't happen!)

There was limited food in my kitchen upon my return (Matthew tends to just sort of snack and get takeout while I'm away, as he's not big on cooking) But I still had the buckwheat flour from the carrot cake I made, and a quick trip to the grocery store yielded a few veggies and a bag of daiya, so I whipped together this yummy (even though not the most aesthetically pleasing) dish. I was inspired to make the ravioli after reading this blog entry, but my recipe is pretty different, as I made it with what I had in my kitchen.

It's quite labour intensive! Keep this in mind, because you'll need quite a bit of time to get everything prepared!
Buckwheat Sundried Tomato Cheese Ravioli in Homemade Sauce
Ingredients:
Pasta:
3/4 cup buckwheat flour (plus more for dusting!)
1/4 cup cornstarch
1/2 tsp xanthan gum
1 tbsp ground flax mixed in 3 tbsp room temperature water
2 tbsp olive oil
1 tsp dried basil
1 tsp dried oregano
Dash Salt
Water (for texture)

Filling:
1/2 cup mushrooms
1 cup baby spinach
1/4 cup sundried tomatoes
1/2 tbsp olive oil
1/2 cup Daiya Mozarella style shreds
1 tsp basil
1 tsp oregano
Salt and Pepper

Sauce:
4 medium sized tomatoes, cut into 4 pieces each
1 can tomato paste
1 tbsp olive oil
Water (about 1/4-1/2 cup, for desired consistancy)

Directions:
First, make the pasta. In a bowl, mix the buckwheat flour, cornstarch, xanthan gum, and spices, stirring with a whisk to sift together.
Add the flax mixture and olive oil, mixing with a spoon to combine.
Add in a bit of water, about a tablespoon at a time, until the mixture is well combined and slightly sticky.
Dust a surface (I used a plastic cutting board) with some buckwheat flour, and turn out the dough onto it, kneading it until slightly elastic with hands also dusted with flour.
When it is ready, divide into small portions, and flatten slightly, dusting each side with more flour. Roll is through your pasta machine. (Alternatively, you can use a rolling pin, but it probably won't get as thin, but it'll still work! Worry pas!)
Using a round cookie cutter, cut out as many circles a you can from the dough! Set them aside for now.

Next, we need to make the filling.
In a frying pan, sautee the mushrooms in the olive oil. When they change color and start to shrink (about 5 minutes or so of sauteeing) add in the spinach, and cook until wilted, about 1 minute.
Put that, as well as the sundried tomato, into a food processor and blend until smooth.
Pour into a bowl, and add in the Daiya and spices. Stir well to combine.

Lay out a ravioli circle, and top with about a tsp of filling. (you need to leave a bit of space around the edges for sealing!)
Top the circle with another circle, and using the tines of a fork, press around the edges to seal. (You may have to add a bit of water between the layers if they aren't sticking!)
Do this for all of your circles. (You can also put less filling onto one, and fold it in half if you so desire!)
You will have filling leftover, but worry pas! We are going to use it in the sauce!

Bring a pot of water to boil, and cook the ravioli for about 5-10 minutes.
While those are cooking, make your sauce.
Place the tomatoes in your food processor (no need to even clean it between steps!) and blend the tomatoes smooth.
Add the tomatoes, tomato paste, and olive oil to a saucepot, and slowly add in water to the desired consistency.
Bring to a boil, and turn to low.
Add in the remaining filling mixture, and stir until the cheese shreds are mostly melted.

Drain your ravioli, top with sauce, and enjoy!
If you have sauce leftover, don't worry! You can freeze it, or use it on other pasta!